|
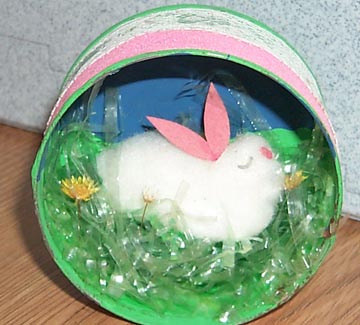
Scene in a Can
Here is what you do:
Tuna fish size cans are just right for putting little scenes in for a table decoration. Paint the
can the color or colors of your choice. Acrylic paints will stick better then tempera paint. If you do use tempera paint add
a little soap and some white glue to the paint to help it stick. Glue strips of pretty lace and ribbon around the outside
of the can. Glue some Easter grass or green yarn bits in the bottom of the can for the grass. Make a bunny by covering a Styrofoam
packing worm with a cotton ball. Cut ears and facial features from colored paper and glue on one end of the cotton-covered
Styrofoam piece for the head. Glue the bunny in the grass. Glue some tiny flowers in the grass around the bunny.
You might want to design a different scene to put in your can. E-mail me a picture
and I'll post it so others can see your good idea.
TUNA CAN SPIDER
Paint a tuna can black. Drill a hole in the center of the bottom of the can, put a washer inside
the can and tie a string to this (to hang the spider). Glue wiggly eyes and red rick-rack to one side for the face. Drill
four small holes on opposing sides, insert black pipe cleaners and hot glue them on the inside of the can. Bend the legs like
a spider and hang up!
(Thanks to Deb Sammons for this idea!)
I wish we had a photo. If anyone makes this
craft, please send us a photo - Tuna For Life
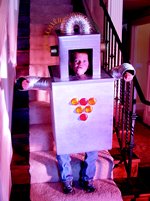
Tuna Robot Costume
|
Materials Needed: Scissors, Ultimate,GlueGun, GlueSticks,,Ruler
Materials For Robot:
Small Cardboard Box (for head)
Large Cardboard
Box (for body)
Box Knife, Spray Paint (Silver),Duct Tape
Vinyl Dryer Hose, Large Screw w/Threads
Battery Operated
Craft Lights
Light Covers (your choice of colors)
2 Tuna Cans, Old Electrical Wire
|
|
Instructions:
For best results, please read all instructions before beginning project.
Refer to photo for color and design placement.
| 1. |
For robot, cut out bottom of large box, using box knife.
Measure placement for holes for head and arms. Measure placement for holes for eyes on small box. Cut out. |
| 2. |
Apply a coat of Silver, following manufacturer's instructions and spraying
in a well-ventilated area. Let dry. Apply another coat of paint. Let dry. |
| 3. |
Center small box onto top of large box. Attach boxes together, using
duct tape on inside. Cover raw edges with duct tape to prevent rubbing. |
| 4. |
Cut two lengths from dryer hose to fit arms, using scissors. Insert each
length securely into hole cut for arms. |
| 5. |
Punch holes for lights, using screw. Refer to photo. Insert lights through
holes, taping assembly into place on inside. Glue light covers into place. |
| 6. |
Glue tuna cans onto sides of head for ears. Curl electrical wire into
a spiral. Glue a piece of dryer hose onto top of head. Glue one end of electrical wire onto tuna cans. Glue opposite end of
electrical wire onto dry hose. |
| 7. |
Glue tuna cans onto sides of head for ears. Curl electrical wire into
a spiral. Glue a piece of dryer hose onto top of head. Glue one end of electrical wire onto tuna cans. Glue opposite end of
electrical wire onto dry hose. |
|
 |